OneGreatFamily Blog

Go Back
  • Are There Thousands Of People Hiding In Your OneGreatFamily Tree?

    How much of your family tree do you want to see when you open OneGreatFamily's Genealogy Browser? Do you know how many ancestors are really in your family tree at OneGreatFamily?

    Many of you may have noticed this on your Genealogy Browser toolbar but never really understood what it can show you:

    Number of Generations Display on the Toolbar

    You will notice this drop down menu in the toolbar section at the top of Genealogy Browser. This convenient menu lets you quickly and easily set the number of generations to be displayed in the Starfield area.

    Many users have never changed this setting and so have never actually seen everything that OneGreatFamily has found for them. If you have never changed this setting, we strongly encourage you to explore this feature. You can select a value off the drop down menu or just enter a value into the box. If you are on a high-speed internet connection, we would suggest you try starting with at least 32 generations. Dial-up users might want to start with 16 generations.

    Remember, the higher the number, the longer it may take to load your pedigree. Still, you could be surprised to see how much OneGreatFamily has added to your family tree, and it will be worth the wait!

    Everyone can see the size and shape of their family tree on OneGreatFamily; however, only subscribers will be able to see the names of the ancestors found by OneGreatFamily's matching and merging process.

    Full story

    Comments (0)

  • How To "Clean Up" Hints And Merge Data

    Hints are possible matches between your family tree and the family tree submitted by another OneGreatFamily user. By resolving Hints, you have the potential to add new generations to your genealogy

    Overview - Here's how it works: OneGreatFamily is constantly performing searches within the OneGreatFamily tree looking to match the ancestors you have entered with the ancestors entered by others. When a potential match is found, a Hint icon () will appear next to or on the name of the individual in your pedigree (Starfield). One of your key efforts within OneGreatFamily is resolving these Hints.

    First step - Make sure Hints are turned on: To use this valuable tool, start by selecting the "View Hints" icon () on your Genealogy Browser Toolbar. This will display a Gen-bulb () icon on every individual in your pedigree (Starfield) that has a possible match.

    Second step-Open the Edit Individual window: Select an individual with the Gen-bulb
    () icon in your pedigree (Starfield). That will load their information into the handprint on the left side of the screen and a Gen-bulb should now be showing next to his or her name in the box labeled "Selected Individual" in the upper left hand corner. Click on this individual's box once to bring up the "Details For:" dialog. Next, click the Hints () button on the right hand side of the box to view the possible match. You are presented with another window similar to the "Details For:" screen, showing the data from the possible match alongside the data for your individual.

    Third step - Deciding if these two people are one and the same: Now you need to decide if these two people are one and the same. Before you decide, be sure to check each of the tabs across the top of the window. You may need to check other records or talk with other family members. Once you have decided, you can proceed.

    Fourth Step - To Merge or not to Merge, that is the question:
    Understand that merging a person with your person doesn't destroy your data or overwrite it. The differences in data will be preserved and will be shown as Conflicts. Information about Conflicts can be found in the newsletter archive section or in the help section of the OneGreatFamily Genealogy Browser. At this point, you have four choices:

    1) Merge the two people by clicking on the button labeled "<< Merge".

    2) Decide not to merge the two people by clicking on the button labeled "Clear".

    3) Postpone making a decision by clicking the button labeled "Close".

    4) Choose to collaborate with the other OneGreatFamily user by clicking the "Collaborate" button. We'll talk more about collaboration in a future newsletter.

    The Power is in your hands: One of the great strengths of OneGreatFamily lies in its ability to allow multiple people to agree that their ancestor is the same person without agreeing to all the details of his or her vital records. Hints are the means to identifying those opportunities and resolving them.

    Full story

    Comments (0)

  • Have More Success By Standardizing Places

    One of the features of Genealogy Browser is the ability to automate place standardization when you are entering data about your ancestors. However, the system is not foolproof, and so automatic place standardization in some circumstances won't occur.

    This can really hinder your efforts at OneGreatFamily because non-standardized place names may cause individuals to not match, blocking a merge that could bring more leads to your attention.

    For example, I was researching an ancestor of mine when I found that my father had abbreviated some places when he entered the data, causing them not to match.  For example, he listed my great-, great-, great-, great-grandmother as being born in Hull, Ykshire,, England.  In doing some research, I have confirmed that this was actually Hull, Yorkshire, England.

    There are several reasons why Genealogy Browser may not be able to automatically standardize a place.  Keep these in mind when you are entering or editing your family tree information:

    • Don't use abbreviations in the place of city names.  For example, use "Salt Lake City" instead of "SLC", use "New York" instead of "NY" or "NYC" and use "Baltimore" instead of "Balt."
    • CA can be interpreted as either Canada or California and DE can either be Denmark or Delaware.  So please, even if you are sure you are using a standardized abbreviation, please spell it out.
    • There will always be 4 elements separated by 3 commas in every place name, as shown here: city, county, state, and country.  Genealogy Browser will automatically try to break down each location appropriately.  You should double-check that it does it correctly.
    • Don't write in the actual street address in the place box. You can put addresses or buildings in the notes section.
    • If you don't know, leave it blank.  Often people will put "???" or "unknown" or "unk." You should avoid doing this because the site will search for matches to fill blanks for you.
    • Make sure and always put the country. It may be obvious to you and others which country it is, but not to the OneGreatFamily system. The more information the better when entering information.

    We have a tool to help if you have any questions on whether you're entering the place correctly. To the right of the birth, death, and other places, you'll see this pencil icon. Click on that icon and Genealogy Browser will show you how it breaks down the current entry into city, county, state, and country. Look in there to make sure your places look correct so you can have your records standardized with the rest of OneGreatFamily's records.

    By cleaning up your place names, your will increase the likelihood of OneGreatFamily finding additional ancestor leads for you, which means you could see more ancestors added to your family tree.

    Full story

    Comments (0)

  • How To Print Your Starfield View

    Here are some detailed instructions on how you can best print out the Pedigree Wall Chart as shown in your StarField view: 


    It is important to understand that when you print a Pedigree Wall Chart, you get exactly what you see in the Starfield.  So, the first task is to set up the Starfield exactly as you would like it to print.  There are a number of settings that you can adjust to get the Starfield exactly how you want it.  The first setting you will want to adjust is the # of Generations to display.  Set it to the number you want to print, remembering that the more generations you select the larger the chart becomes.

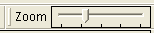
    You will definitely want to adjust the zoom, font and magnify sliders. These sliders allow you to tweak your Starfield view exactly how you want it to look.  Not all of these sliders are available by default; you must change some settings to access them.  First go to the "File" Menu in Genealogy Browser and click on "User Preferences" to see the following box:

    Notice the red circled area labeled "Computer Expertise Level." This setting changes the Starfield formatting options presented to you as follows:

    Beginner: Only the Zoom slider is available at this setting. It is located on the right side of the Toolbar in Genealogy Browser:


    The Zoom slider changes the size of each box in your Starfield. As the box gets bigger more information can be displayed. From 0-47% only a box will be shown; from 48%-73% the name will be shown; from 74%-99% the name will be bolded and birth date are shown; at 100% the bolded name plus the birth date and birth place are shown.

    Intermediate: In addition to the Zoom slider a Font slider is added. It appears right below the toolbar and runs the width of the window:


    This slider changes the size of the font used in each ancestor's box. It will increase or decrease the size of each box in order to accommodate the font size. However, it doesn't increase the amount of information shown--only the size of the font used to show the information.

    Advanced: A Magnify slider is added in addition to the Zoom and Font sliders. It is located below the Font slider, and also runs the width of the window:


    This slider allows you to proportionally increase or decrease the size of everything in the Starfield. If you are ready to print, but your Starfield is just a little too wide for your paper, you can shrink it down a touch with this control. Everything will look the same, it will all just get smaller (or bigger).

    Experiment with each of these view choices in the Starfield so you can see how each one is different.

    Once you are satisfied with how your Starfield looks, you can go to the File menu and choose "Print". To print your Starfield View choose the following:


    It is very important to click the "Print Preview" button before you hit print so you can make sure it is printing exactly how you would like it to look. You can then click the "Print" button on the above box or in the "Print Preview" window.

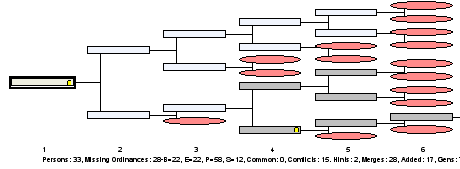
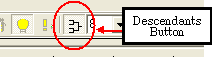
    Optional: You can also print an Hourglass chart. An Hourglass chart shows both the ancestors and the descendants of a person. Click on the "Show Descendants" button on your toolbar:


    Your Starfield will look like this:


    Then follow the steps above so you can change the zoom, font and magnify until it looks how you want to print it.

    Printing your Starfield is a great way to show your family and friends your family tree. Remember that you can print as many or as few generations as you want. When printing the Starfield, you can print a wall chart. This means that you can print your Starfield large enough to fill an entire wall! If your printer uses standard 8 1/2" by 11" paper, a wall chart can be created by taping the pages together.

    Full story

    Comments (1)

  • Family Information Box: Merge Identical Children

    When several people upload information on the same family line, sometimes, duplicates are created that can't be automatically merged. This is usually due to there being different information submitted. To merge duplicates you will need to launch Genealogy BrowserT. In order to merge duplicate children for a family you will need to open the family information box in Genealogy Browser. You'll do this by clicking on the tab labeled "<<Family Info>>" directly under the selected individual in the HandprintT (on the left hand side of the screen).

    When you do a window will open with the family you have chosen.

    By clicking on the names you want to merge you will be able to select them. The selected names are highlighted in blue. You will then click the merge button on the right.

    When you click merge, two new windows will appear. Each will contain information on the individual you have selected to merge. After carefully comparing the information and verifying they are the same individual, click the "Merge" button in the right hand box.

    After clicking "Merge" a new window will appear and ask you to verify that you want to complete the merge. To complete the merge click "yes." This will combine the names, as well as the information you have selected, into one record. The merged individual's OGFN will become the OGFN of the individual into which it is merged (the one on the left). The information in the OneGreatFamily database will then updated. Relationships may have changed that may affect this Starfield; you will be asked if you would like to refresh the Starfield. When you click "ok" the new changes will take effect.

    Full story

    Comments (0)

  1. «
  2. 1
  3. 2
  4. 3
  5. 4
  6. 5
  7. 6
  8. »

Ancestor Search

Enter Ancestor's Last Name:
Advanced Search
See what information we have in our database of over 190 million unique entries. Browse Alphabetically
  • Photos
  • Biographies
  • Histories
  • Country Origin
  • Alternate Spellings
  • Number of Generations
“...One person can't possibly do all of the work alone. They need help to speed up the work...The only way to do this is with your wonderful service...”
—Jeff Bagley
More Success Stories


Watch Demo

Use the buttons below to navigate through all four demos.

Previous Restart Next

Demo: Introduction

Learn More

Close